

Create this ribbon rack for only $10! It holds over 100 spools of ribbon!
Materials:
- [3] Sheets of 20x30 inch white foam board $3 (I purchased mine for $1 each from a local dollar business establishment. You can also purchase foam board from any department store or craft store, it may be slightly higher priced.
- [1 roll] White Duct Tape $4 (You can purchase colored duct tape from any hardware or craft store)
- [5] 1/4x36 inch Wooden Dowels $3 (I purchased mine for $0.60 each at a local craft store)
- Pencil
- Box Cutter
- Tape Measure
Directions:
- You will need a large, flat surface to work on.
- Put aside one sheet of foam board to use as the back of the rack.
- Using your second sheet of foam board, measure THREE 5.5x20 inch sections.
- On a safe, flat surface, use your box cutter to cut along the lines. Discard the extra.
- Using your third sheet of foam board, measure TWO 5.5x30 sections.
- On a safe, flat surface, use your box cutter to cut along the lines. Discard the extra.
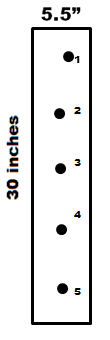
- Using the 5.5"x20" sections, measure and mark where your five wholes will be. Depending on the size of ribbon you use will depend on the number of rows you use and the spacing of your holes. I left about 1/2" more room around my first row because I have a few larger spools. Make sure you mark all THREE of your sections for each dowel will go threw all three holes.
- After you've marked your holes, use your pencil to puncture each hole.
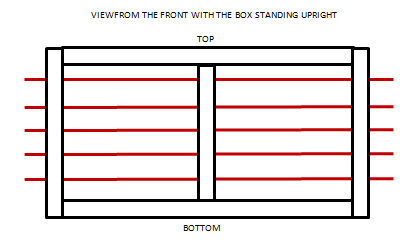
- Now you have to put it together! Lay the BACK on a flat surface. Fit two of your 5.5"x20" SIDE sections along outside the BACK as pictured. Its important that the sides be fitted in the position shown so your box fits evenly. Use your duct tape to secure your SIDES in place. I taped both the inside and outside for added strength.
- Fit your 5.5"x30" TOP and BOTTOM sections between the SIDES and use your duct tape to secure the TOP and BOTTOM in place. I taped both outside and inside corners.
- Now fit and trim the MIDDLE section so it fits snugly in the middle of the box. Use your duct tape to tape the MIDDLE into the box.
- Stand the box up. Insert your dowels into the holes.
- Add your ribbon and you're FINISHED!


You can add clothes pins to the outside of your dowels to keep them secure. This DIY Ribbon Storage Rack should be stored in a safe location on a flat surface and transportation should be limited. If stacking a second layer, please take extra stability measures to secure it to a wall.
I absolutely LOVE my new ribbon storage rack! It makes working with my ribbon more manageable and efficient, not to mention it organized and cleared my work space.

Enjoy!
Thanks a lot for providing such a nice information about Ribbon Storage Rack. This blog looks more interesting to read and contains awesome creativity that attracts everyone to comment about it. The technical specification which you have provided was good. It looks compact and occupies less amount of space. Storage Rack.
ReplyDeleteyou have done a good job.it was a nice information kepp it up.Cable Runways, Cable management, Cable Organizer Manufacturers, High Density Cable Organizer, High density cable management to fix the Run way above the rack or On The Rack or Below the ceiling and complete management. Server Rack in ahmedabad
ReplyDelete